The booking system of DPCalendar is highly adaptable to work perfectly for your specific use case. In the global DPCalendar options, the site admin can adjust the settings explained below.
If an event is a series then there are three different modes for the booking form available which is controlled by the "Book Series" option in the Event booking configuration:
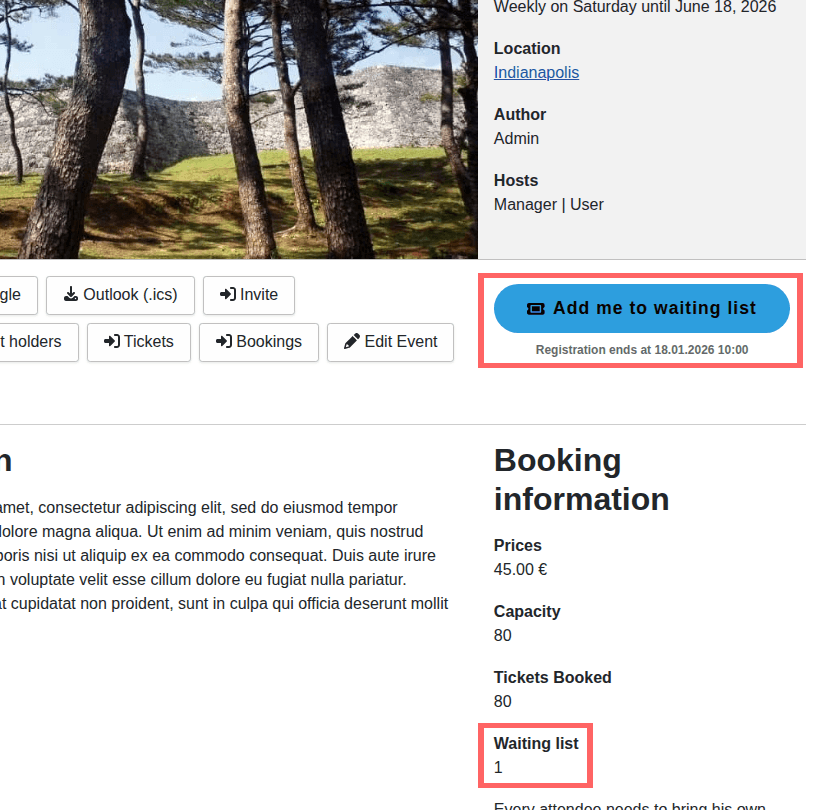
If an event has enabled the waiting list flag, then bookings can still be made, but are added to the waiting list when the capacity is full. The admin has to put the booking from the waiting state into either reviewed (paid bookings) or invited/activated (free bookings) once there is some free space available.
With DPCalendar it is possible to have some user actions after a booking is done. If the booking is done as none logged in user, then the site admin has the possibility to automatically create a user or to display the user registration form. The later is called gradual engagement to smoothly bring the user to the point to create an account on your site. The former one creates a user with the E-Mail address of the booking. On the first log in the user needs to set a new password because of security reasons.
DPCalendar has very clear steps to book events. These are:
There are various settings, in the booking system tab of the global DPCalendar options, to define who gets a mail:
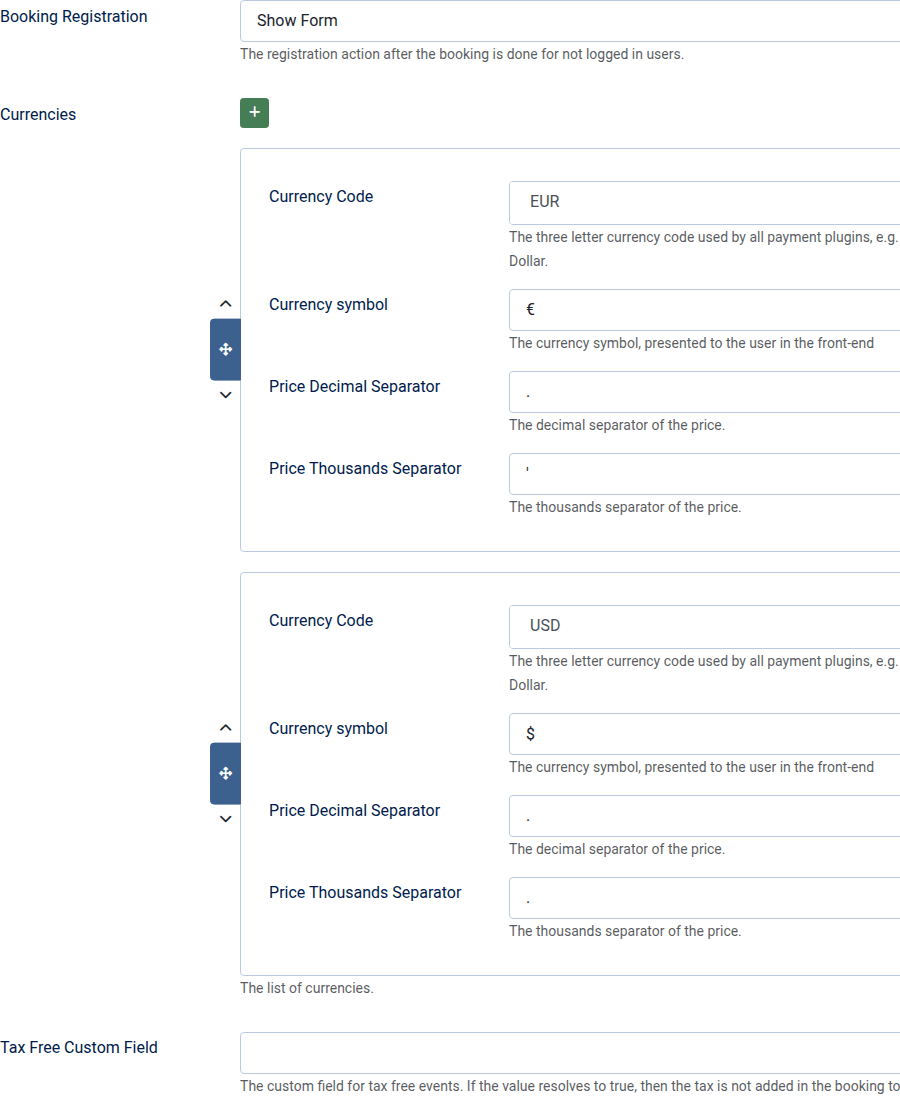
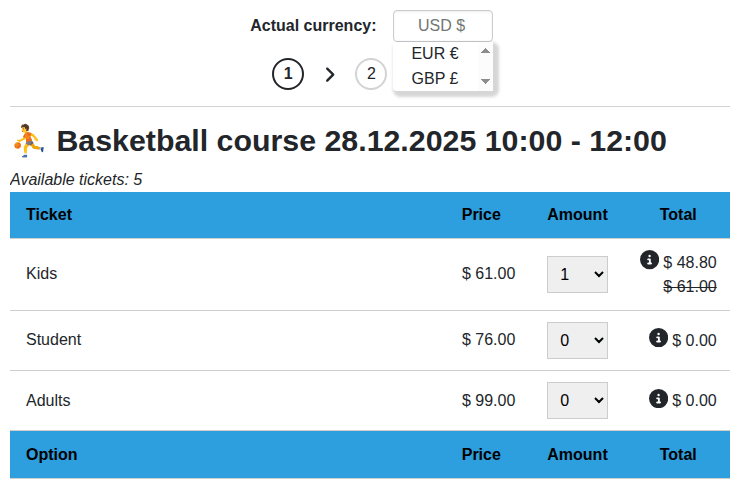
The DPCalendar booking system supports multiple currencies. This means that prices and booking options can be configured per currency. In the global DPCalendar options it is possible to define unlimited currencies, each one with the identifier, symbol, decimal separator and thousand separator.
The "Exchangeratesapi API Key" and "Exchange Fee" are described below and are there for automatic currency conversion.
If the event has a price for the selected currency of the user then the system assumes that the currency is set up properly and does no automatic conversion. Is this not the case and the visitor changes to a currency where the event has no configured price for then an automatic conversion is done. As default the conversion is used from the folder from /administrator/components/com_dpcalendar/config/default-exchange-rates.json. If an API key is set for exchangeratesapi.io, then is the exchange rate of the current day used. The rates for each day are stored in the folder /administrator/cache/com_dpcalendar-exchange-rates and can at any time be deleted through eh cache manager interface. Keep in mind that the exchangeratesapi.io has a free tier limit of 250 requests per month, so the cache should not be deleted too often or only the past days if space is limited.
It can be adjusted with an additional fee. Often it is the case when your payment service account receives payments in another currency, they convert the price into your currency with a lower exchange rate. This option forwards it to the client.
The booking ID is a random generated string which contains of numbers, letters and dashes. Different companies have different needs for the UID, some want a date, others the plain ID or a timestamp. That's why it is possible to define one of the following uid formats as invoice number for a booking.
This is the most flexible options, but needs some PHP skills as it is a layout override. To do so, copy the file /components/com_dpcalendar/layouts/booking/uid.php to /templates/{{your template}}/html/layouts/com_dpcalendar/booking/uid.php and /administrator/template/isis/html/layouts/com_dpcalendar/booking/uid.php (when you edit it in the back end). Now you can adapt it to your needs, both overrides do need the same code. The booking is accessible through the variable $displayData['booking'].
For example if you want to make it with the date and the id of the booking, you can use the following code:
echo \DigitalPeak\Component\DPCalendar\Administrator\Helper\DPCalendarHelper::getDate($displayData['booking']->book_date)->format('Ymd-H:m:s', true) . '-' . $displayData['booking']->id;
It generates as invoice ID then 20200305-14:03:53-12 for a booking which is created on the 5.th of march with the id 12.
The same can be applied for tickets, just use ticket in the path for the files and $displayData['ticket'] to get access to the ticket.
The data format uses the booking date and the id with the pattern "Ymd-H:m:s-id". This will generate an invoice id like "202406141345-15" where 15 is the id attribute of the booking. The id part is the booking id to have an increment unique number in the invoice number.
The timestamp uses the booking date as seconds since 1970 and the id. This will generate an invoice id like "1726554066-15" where 15 is the id attribute of the booking. The id part is the booking id to have an increment unique number in the invoice number.
The random unique string format is a hex-encoded random "Universally Unique Identifier", similar to what can be found in ical uid strings. Absolute uniquenes is not guaranteed but it is ok for most booking systems. It generates an invoice id like "C3F726CD-A857-413A-BA21-5FE43367F7E7" which is unique on the system.
In the DPCalendar permissions, it is possible to give certain user groups admin rights to manage the bookings or tickets. Use the permission with the label "Admin Booking/Tickets". Like that you can separate DPCalendar admins from the booking admins. More information can be found in the ACL chapter.
DPCalendar supports the valid domain settings from the user component. Like that can the admin allow bookings only from specific email domains. This setting supports unlimited domains and can be configured in the back end options from the user component.
For certain user groups, double email verification can also be enabled. Attendees in these groups are required to enter their email address twice, and copy-paste is disabled for the second field.
The settings can be configured globally in the DPCalendar options or per menu item. If the value is empty in the menu item, then it will be inherited from the global options.
Comments (0)